Take
a brush and paint a dayfly!
What makes fly fishing so fascinating is the fact, that it can be associated with so many other hobbies. Someone starts even learning to tie flies and then gets interest in fly fishing. Most of us go the other way round - we start fly fishing and then by talks with other fishermen get the knowledge, that one can tie ones own flies and that with great reward.
Then one starts to find out, that the flies shall imitate certain insects, and then the way is not fare to the nearest library to enlarge ones knowledge of biology from school. Some starts to build up their own library and then one is on the way to be a book-collector and not only uses ones spare-money on fly tying materials but also on old, much looked after, angling books about our beloved hobby.
To make good imitations it will always be an advantage to have the real things in front of one, when one binds them. Unfortunately dayflies, sedges, stoneflies and name them all are not easy to bring home. They can be damaged in the small containers or they change colours in the time it takes to bring them from ones angling water to home, and it’s the colour they had when we caught them on the water that’s of importance - that’s what the fish sees.
Some people try to maintain them on colour-film, and that’s an art by itself.
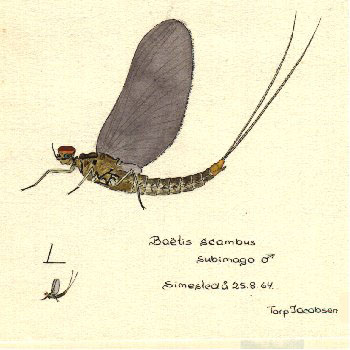
I have tried to ‘immortalise’ them in drawings and then afterwards give them the right colour using watercolours.
The prehistory to this is rather peculiar. I had written my first book about dry fly-fishing and wanted to include illustrations in colour of the different hackle-feathers and dayflies. I made contact to one of the most ardent illustrators of scientific works we had - Poul Winther. Unfortunately he was very sick at the moment and had moreover a lot of work waiting from the ‘Galatea’ - deep-sea-expedition. A good friend of mine, the late Henrik Bech, suggested that I started myself making the drawings and afterwards put colour on. His belief in my abilities did, that I drove to Aalborg to a paint shop, bought watercolour paints and tools and started on my own, trying to learn the art. Even in my time at school we had learned a little about using pencil and brush and water-colours and I had now to renew my knowledge and even better it. In a month time I had already made great progress and had painted the hackles, and then I started on the dayflies (Ephemeropterae). Half a year later I had all the drawings ready for my book. It was not so difficult as it looked on beforehand - and in additions one learns to look at the smallest details in their body.
The hackles were the easiest to illustrate - they ‘keep quit’ and that even I used much time. I could of course had made them on colour-film; but then I had to make a lot of experiments, then their colours depends totally on the background on which they are taken- if one wants all the finer details one has to use the darkest photo-paper as background and that makes them very sombre. With Indian ink and watercolours one can reproduce them in the right structure and nuance.
Quite the opposite when we shall draw dayflies and other insects - they are always moving around or they take a position that makes it difficult to illustrate them. Many times like in nature they want to sit upside/down. With some patience I succeeded - and one shall really have good time and use much time; but then the results will be a fine reward.
Why not also ‘immortalise’ them on film, as many ardent photographers do? Even with the best equipment and films one can’t get the same results as with pen and brush. With these we can illustrate the finest details and moreover we can illustrate them with the light coming from behind and front. I know for sure, that the only things we need are an impression of the overall colour of breast (thorax), body (abdomen) and wings - we shall not like e.g.. F.M. Halford try to copy every detail on our hooks. But when we shall make a drawing and afterwards put colour on, why not make it as exact as possible [As Francis Francis once said “If a thing is worth doing - it’s worth doing it well”]. When we afterwards look at the pictures we can make our own conclusions in what way we shall imitate them! My Finish friend, the architect, the late Simo Lumme, used crayons in the three main-colours and on a rough sketch of the fly he placed the colours of the main-parts and by this got a moment-picture of the fly that afterwards could be used as a fine guide, when he sat and created his artificial flies.
Many of the colour-pictures of insects and flies in angling books are reproduced in a too small scale - many of them nearly useless. When we shall make our drawings and afterwards reproduce them, it shall be in a scale from 5-10x.
At the start I bought a colour-box (Winsor & Newton) with half-pans and at start a few colours, but as usual I supplied and ended with these:
Cobalt Yellow - Cadmium Red - Burnt Sienna - Cobalt blue - Emerald Green - Ivory Black - Chinese White - Raw Sienna - Venetian red - Burnt Umbra - Davy’s Grey.
Of brushes I bought the finest round Sable brushes - sizes 0,1,2 and one bigger for larger surfaces - they are expensive but their money worth. The smallest are working with such a fine point that one can use them as if they were an ink -pen. Then one needs a few containers of glass or plastic in which to mix water and colour. The water shall be distilled or boiled and one keeps it in a small plastic-bottle.
I tried also to use real watercolour paper for my drawings of hackles and insects; but I found that good, smooth drawing cartoon was much better for my purpose.
One moisten the brush and makes a few strokes over the surface of the colour-tablet in the pan and then turns the brush in a few drops of water in the little cup and repeat the process until the colour is right! Then one ‘paints’ a small quadrate and sign it with the name of the colour and by this one creates a sort of colour-catalogue for reference.
For ‘larger surfaces’ - e.g. the wings of the dayflies, one needs one of the bigger brushes; but don’t use too much water, so that it runs - the paper will bulge and it takes a longer time to dry. I have always used as little water as possible and by this it is easier to control. The same is the case when it comes to the finer details - I have only dissolved the colour in very little water and only so little on the fine brush that I could use it as an ink -pen and make fine lines and dots. By this they dry very fast and one can add other colours without the risk that they shall run into one another.
The main rule is to start with a ‘weak solution’ - one can always make it darker. The opposite way is much more difficult.
The best way to learn it is to start - a small box with colour-pans, a few brushes, a water-bottle and a piece of alufolie (from which to make cups) and a good pencil and paper fill up very little in ones fishing bag - and are the trout or grayling dull and the weather is good, then there is nothing more beautiful than to try make a small drawing and later colour it.
Good luck!